How Can I Tell if My Wall is Insulated?

An example of the many areas insulation is used when sealing a typical building hallway.

How to Check for Insulation In Exterior Walls From Washington, DC Area Drywall Experts

It’s February 8.  It took a while to get cold this winter – back in November, it was balmy enough that you started to wonder if maybe there was something to the whole global warming theory.  But by February 8, it has officially been cold for over a month and a half.  You haven’t spent much time in either of your downstairs bedrooms for about as long.  Never mind that the larger of the two bedrooms is supposed to be your office; you’ve been finding yourself curled up on the couch in the living room with your laptop on your days to work from home.  The other bedroom – a guest room with beautiful windows that you like to read in during the summer – is basically a glorified closet at this point, the bed piled with extra toilet paper from the Costco sale and unwanted Christmas gifts that you haven’t found happy homes for yet.

The problem is that those two rooms are just impossible to get warm.  Never mind that your gas bill is over $200, and the upper floor of your cape cod is unbearably hot unless you dress like you’re at the beach; those two bedrooms linger in the low 60s/high 50s no matter how hard you crank the heat.

If you live in an older home, your problem may very well be that the exterior walls aren’t insulated.  Ideally, in between the exterior particleboard and the interior drywall, you should have a layer of insulation.  It could be batts of fiberglass (the fluffy pink stuff) or rock wool, or it could be loose fill – a kind of confetti of paper, fiberglass, or rock wool that fills up all the cavities in between the “bread” of the interior and exterior boarding – or it could be sprayed-in foam.  With something other than dead air in between the layers of wall, your rooms should hold their heat even against the coldest weather.  Without such a buffering layer, however, your rooms are probably doomed to stay chilly until the earth circles around its orbit far enough to make the warm weather come back.

How can you tell if your walls have insulation in them?  The way your room holds heat can give you a strong clue (i.e., if it doesn’t hold its heat, it’s probably not insulated), but if you want to know for sure, the only way is to open the drywall and take a look.  Ideally, you want to remove drywall in a space where it will do the least damage to  the look of the room; around a piece of window trim or a light fixture.  If you remove only a small amount of drywall, it will be tricky to get a good look, but if you remove a larger piece, you will need to have it replaced.  Obviously, only the exterior walls need to be checked; there is no purpose to insulating the interior walls, unless you are concerned about soundproofing.  If the insulation is in there, you will be able to see it.

And if it isn’t?  You might want to consider adding insulation.  It can be blown or sprayed in through small cracks cut in your drywall, or your drywall can be removed completely so that batting insulation can be installed.  It all depends on how much of a procedure you are willing to go through, and how efficient you want your newly insulated walls to be – batting insulation tends to be more efficient, but it costs more and takes longer to install.  The crew you hire to install your new insulation should be certified and trained to work with both insulation and drywall, and should be able to advise you on your options.  And when your new insulation is finally installed (or when you cut a hole in your drywall and find that there’s already some in there, and that your room is cold because there’s something wrong with your HVAC), and you decide you need some patching up and a new paint job, give Blue Door Painters a call.  That freezing cold bedroom could turn into your new favorite winter den.


Texture Paint for Badly Damaged Walls

Stucco is a great way to hide cracks or blemishes. Give it some texture!

Blemishes are unfortunate occurrences on all of life’s surfaces.  Try though we might to banish them, they still manage to decorate our skin, our cars – and even the walls of our homes.  Luckily, unlike with skin or automobile paint, with architectural interiors there are a lot of different options for getting rid of – or covering up – blemishes.  You can spackle, smooth, and prime, you can rip out and replace whole sheets of drywall…. or, for a creative alternative, you can try this texture painting method to render the blemishes on even a highly damaged wall totally invisible.

Texture paints are concocted using the same ingredients as regular paints, but there is much more filler pigment and bulking additives mixed in so that the final consistency is much thicker.  Rather than running on as a smooth, silky liquid, texture paints are more like pancake batter, and they hold some of their dimension when applied.  Operating almost like a thin coat of wet plaster, texture paints allow you to sculpt and contour the surface of your coating, creating unique effects – and successfully hiding any blemishes in color or texture that might exist in your substrate.

To apply a layer of texture paint to your wall, it is first (as always) important to prep.  You should sand and scrape off any old paint and loose or flaky material, patch major holes, and use a competent primer to ready the surface for its coating.  You don’t need to worry very much about visual coverage, however, nor about dents, nicks, dings, scrapes, or seams from unremovable old coating layers – the texture paint will hide all of that like it was never there!

Next, pick a texture for your surface.  Any texture you pick, paired with the thickness of the paint, will be sufficient to totally disguise any blemishes.  You can create speckles, stripes, or dapples by using a special textured roller.  You can cut swirls into the paint, or create an irregular stucco effect, by using a trowel.  You can press a textured surface – like crumpled wax paper – along the surface of the paint when it is tacky to create a marbled effect.  You can use a small brush to pull out tiny peaks and valleys.  The sky is the limit when it comes to texture options – you are only as limited as your imagination.

When you apply the paint, work in sections, slapping it up there and then creating the texture in that section before moving on to the adjacent section.  Unless your texture involves a strict repeating pattern, provide some textural overflow from one section to the next, so that you do not create seams in your texture.  Paint should be applied at roughly 1/16 inches thick, at room temperature to achieve the ideal viscosity.

So now you’re all set!  At the end of the project, your walls will have a bold rustic look – and they’ll be, (as far as the eye can see), totally blemish-free!


How Do I Deal With Water Damage?

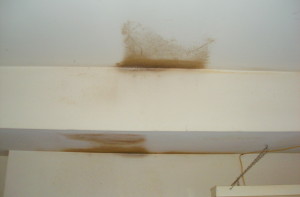
A couple of water damage stains on an interior ceiling.

Information on Managing Moisture in Interior Surfaces in the Washington, DC/Northern Virginia Area

One of the major purposes of shelter, for any living creature, is to keep out the elements.  Heat, cold, sun, wind – and, undeniably, water – need to be kept under strict control in an indoor environment if it is to remain a suitable shelter.  Modern homes and buildings utilize thousands of years of complex technology in order to keep out the elements, but it is still an ongoing struggle.  In this blog we share our years of contracting experience on what to do when unwanted moisture ends up inside your home.

First of all: why is interior moisture a problem?  Obviously, no one wants to live in a swimming pool, or to have their furniture and belongings soggy, but moisture can also cause serious problems when present in far less dramatic quantities.  Moisture undermines the structure integrity of most architectural building materials, encourages the growth of mold and mildew, and can cause paint jobs to completely fail.  While exterior substrates (vinyl siding, stained decks, roofing) are designed to resist water, interior substrates are vulnerable, and will degrade rapidly in the presence of persistent moisture.

Second of all: where does interior moisture come from?  If your basement or another part of your home floods, or if your roof or upstairs bathroom leaks aggressively through the ceiling, then the source of your moisture will not be a mystery.  But sometimes a slow but steady leak in unexposed plumbing, a capillary effect, or even a place in your home that has a cooler microclimate, can cause subtler examples of moisture damage.

Third of all: how can you tell you have moisture damage, and what the source of the moisture is?  Moisture damage will be detectable in a building because it leaves behind a stain on surfaces like drywall, paint, wood, and stucco.  The shape and location of the stain will offer some clues as to what kind of moisture source you are dealing with.  A round stain on a ceiling, or upside-down teardrop shaped stain on the wall, both indicate a long, slow leak, likely in the plumbing.  If the stain grows more rapidly when it is raining, then the source of the water is the exterior of the house.  If the stain is in a long line on the ceiling, it may come from a more diffuse leak in the plumbing.  Stains from capillary action usually come up from the ground in line in a moist area, and stains from condensation are usually irregularly shaped patches near a microclimate change in the house.

Finally: what do you do about moisture damage?  Because moisture damage is associated with both structural and health threats, it is essential to fix water damage as soon as the problem is observed.   The steps are simple.  First, locate and eliminate the source of the moisture.  Second, cut out and remove all of the damaged substrate: drywall, wood, paint, and all.  Finally, replace the damaged substrate with dry material, close the seams as thoroughly as possible, and repaint or refinish the patched area (as well as some of the surroundings, if you are concerned with the patched area sticking out).

Blue Door Painters is proud to offer water damage remediation as one of our services in the Washington, DC, and Northern Virginia area.

What Can I Do About Ice Dams?

Pretty icicles? Yes. Problematic ice dam? Also yes. (photo by Suat Eman)

What is the most beautiful feature of a winter landscape?  Many people would answer that the long, elegant icicles hanging off of a house are.  And what is the most common cause of interior paint failure during the winter?  Same answer.

“Ice dams” are rims of ice along the outside of your roof that are formed by the differential heating created by your house’s microclimates.  In short, warm air from your climate-controlled home rises out through your roof, warming and melting the wintry precipitation that has collected there.  That melted snow and ice runs down your eaves and collects around your gutters and the rims of your roof.  Since the heat is concentrated in the center of your roof, the water that runs down your eaves tends to freeze again once it gets to the gutters, creating a rim of ice known as an “ice dam”.  As more and more fluid gets added to the ice dam, it runs over the sides and creates the beautiful hanging draperies and icicles that enchant the imagination.  It also adds weight to the edges of the roof, tearing down gutters and shingles, and in some cases causes the water to back up into the house, causing a signature pattern of water damage, mildew growth, and general paint failure.  Paint failure caused by ice dams is so common and so distinct that the trained eye can diagnose it within seconds.

If you suspect that you have paint failure caused by ice dams, or if you notice ice dams on the rims of your roof and are concerned that water damage might soon follow, Blue Door Painters estimators are thoroughly trained in spotting and mitigating this unique problem.  In addition to repairing any existing water damage and repainting the problem area, there are certain steps you can take to prevent damage from ice dams in the future:

1. Check the insulation in your roof.  Improperly insulated roofing is a leading cause of ice dams, because the snow will only melt if a sufficient amount of your household’s heat escapes to melt it.  Ensuring that your roof is properly insulated is a wise idea anyway, because it will impact your heating bill.

2. Consider adding a roofing ventilation system.  Soffit-to-ridge ventilation systems are some of the most effective additions to a roof that keep it cold enough to avoid snowmelt, although retrofitting existing roofs with this kind of surface can be challenging.

3. Reinforce the waterproofing around the rims of your roof.  This can be done from the interior or the exterior, and will prevent the water from entering your house even if an ice dam does form (although it won’t save your gutter and shingles from the mechanical damage caused by the weight of the ice dam).  Just be aware that the water will collect and rise above the waterproofing section if it is not escaping into your house, so you should waterproof a larger area than you expect to see damaged.


How Can I Protect My Deck From Snow?

Protect your deck and beware of rime ice!

Tips for winter deck care from Washington, DC / Northern Virginia area painting and deck staining contractor.

Early in the morning, you peak out the window to behold a winter wonderland.  Your front lawn is a pristine sea of sparkling white.  Your sidewalk is a pristine sea of sparkling white.  Your back deck is a pristine sea of sparkling white….

Wait a minute: Is that okay?

Without protection, decks take a beating from the elements.  Heat and cold, sun and rain, will all weather your deck at an accelerated rate.  All four seasons bring unique challenges to exposed wood: summer brings heat and sun, spring brings excessive rain and drastic temperature changes, and fall brings the tannins of all the fallen leaves.  Winter brings frosty cold – and with it, the great array of cold-weather precipitation: snow, ice, and sleet.

Of these, ice rime is the only one that you really need to worry about.  Snow and sleet will add moisture to the deck, and cold temperatures will take their toll, but nothing acute will go wrong during a snowstorm, no matter how many inches of snow you get.  Decks are very strong, and can survive even a serious blizzard.  Ice rime is a different creature, however.  Without proper finish to the wood, a solid layer of ice can work its way into cracks and pores in the wood, and the expansion and contraction that comes with freezing and thawing can lead to splintering.  A good deck sealing job in the fall can go a long way to protect against this situation.  If sealing or resealing your deck is a job that you put off for the spring, however, and you look out your window and want to clear a layer of ice from your deck, (or if you would like to be able to safely traverse it), you should follow these tips:

1. Do not chop ice with a shovel; the blade of the shovel can damage the wood
2. Melt the ice with rock salt, calcium chloride, or an environmentally friendly alternative
3. Shovel any snow, slush, or other wintry debris with a plastic shovel, using strokes that move along the boards, not cutting across them (the edge of the shovel may catch on the edges of the boards and damage them)

Generally speaking, unless you get a large tree trunk coming down, a single winter weather event will not be sufficient to damage your deck, so if you want to leave it as a pristine winter wonderland, go ahead.  It is the cumulative effect of all four seasons that wears out a deck that hasn’t been properly stained and sealed.  If this is something you find yourself worrying about this winter, why not consider staining it when the weather gets better in the spring?  It might do wonders for your deck’s beauty and durability – and, next winter, for your peace of mind.


Challenges and Benefits of Remodeling in the Winter

There are some benefits to remodeling in the winter. (photo by Simon Howden)

There are many reasons not to remodel in the winter.  The harsher the elements, the more environmental challenges are posed to an exterior job.  Exposure to extreme winter elements makes new coatings and other work so vulnerable to failure that most contractors (Blue Door Painters included) postpone exterior projects until mid-March, when temperatures become more stable.  Interior projects, though protected from the elements by climate control, require you to give up some of your indoor space – and in the winter, when the outdoors isn’t a nice place to be, losing access to a portion of your interior space can be extra stressful.  Added risk, added inconvenience: the challenges of remodeling in the winter provide such a clear and obvious deterrent that it is no surprise that very few people take on a remodeling project during this season.

So what are the benefits?  In a nutshell, the benefit is that very few people take on a remodeling project during this season.

What this means for your project, is that you will get more attention – and more opportunity for savings – from everyone involved, all along the supply chain.  The stores selling supplies will be doing less business, and may be running slow seasonal sales.  The contractor working on your project will undoubtedly be running fewer jobs, and will be available to focus only on you, therefore ensuring that you get maximal attention.  For remodeling projects that involve complex supplies, there is likely to be a much shorter wait time to order the necessary parts in the winter versus in the other three seasons (when everyone else is remodeling).  Finally, many contractors, Blue Door Painters included, offer special discount incentives for customers willing to offer work during the slow season.

In addition to saving money and benefiting from the special care that comes from being the center of attention, you will have your space all ready to enjoy when the warm weather finally hits.  While it is certainly a trade-off, since you have to spend some time being less comfortable indoors during the winter (when you can’t go anywhere else), when the warm weather hits and you want to start focusing on other things (like throwing barbecues and going camping), you won’t have your remodeling project hanging over your shoulder anymore.  It will be all over and done with – with extra care and at a fraction of the cost – for you and your guests to enjoy.  Which is enough of a reason to balance all the downsides.


Winter Decoration

Full-spectrum lights mimic sunlight, covering the electromagnetic spectrum from infrared to near-ultraviolet.

Environmental psychologists and Feng Sui practitioners, coming from two extremely different intellectual traditions, tend to agree on two things:
1) the winter is the most challenging season for human psychology, and
2) the way that an interior is designed can play a strong role in mitigating the impact of this difficult season.

What makes the winter so hard?  Two factors seem to contribute: first, that special brand of claustrophobia known as “stir-crazy”; and second, the lack of sunlight.  It’s not the cold that truly unsettles us, according to recent medical research – it’s the darkness. The human tendency to get depressed and lethargic in the winter has been studied extensively under the diagnostic name Seasonal Affect Disorder (SAD), and psychologists have had some success in treating SAD with prolonged exposure to full-spectrum light.  At the same time, practitioners of the ancient Chinese art of Feng Shui, which is the careful arrangement of interior environments to maximize personal success and fulfillment, have developed techniques to bring what they call yang energy (warm, lively energy) into an interior to balance out the surplus of yin energy (cool, introspective energy) that occurs during the winter.  Using the combined wisdom of these two traditions, Blue Door Painters has assembled some simple decorative tips for weathering the winter.

1. Change your interior decor to match the season.  Both practically and aesthetically (not to mention energetically, if you’re a Feng Shui enthusiast), arrangements that are designed for the summer -harmonizing with the intense light, warmth, openness, and activity of the long days and sticky heat – will clash with the needs of the winter.  In the summer, you want coolness to balance the warmth; in the winter, you want the opposite, and if you keep the exact same decor all year round, you will feel the tension.  Even if you only make minor changes in your interior decor to acknowledge the changing seasons, you will benefit psychologically.

2. Maximize light.  Now is the time to bring out a few more lamps and mirrors, and to mix in some light-valued colors that will capture and enhance the visible light in your interior spaces.  Focus on full-spectrum lights for your primary illumination, because they interact differently with your body’s physiology and protect you more thoroughly against SAD.  For corners and nooks in your home that tend to stay in shadows, now is a good time to bring out small lamps, candles, and mirrors, so that the whole of your interior can come alive with light.  And never underestimate the power of a skillfully placed mirror, or light-colored, lively painting or wall hanging: direct light sources aren’t the only way to spread light around a room.  If you are considering a repaint in the winter, focus on the light-valued colors that will capture and hold whatever natural light the room collects.

3. Maximize warmth.  Adding warm-colored accents helps the yang energy circulate in your interior, which is a good antidote to winter’s lethargy.  Red, orange, yellow, tan, and brown (provided the brown has more red than blue mixed in) have all been demonstrated to give a psychological impression of warmth, regardless of their actual, physical temperature.  Pillows, rugs, draperies, bedcovers, artwork, and even wall and window trim in warm colors can bring life into a room in the heavy winter months.

4. Make it cozy.  While you want to maximize light, you also want to make the home feel secure and protected against winter’s cold.  This might mean adding some extra layers between your interior and the outside world; heavier draperies, thicker rugs, comforters draped over couches and loveseats, can all enhance the impression of warmth and protection.  Having a window open while the sun is shining enhances the light in the room, but having it framed in thick, warm-colored curtains, which can be drawn shut when the light outside grows weak and starts to fade, creates a subtle sense of security.

5. Incorporate nature.  We miss the outdoor world when we’re stuck inside, even if we aren’t big outdoor enthusiasts.  A few extra houseplants, or skillfully placed paintings or photographs of natural settings, can help us feel more connected to nature and to the coming activity of spring.  If the pictures depict winter landscapes, all the better; that way the beauty of winter can be celebrated from the warmth of the indoors.

Touching Up After the Holidays

Four reasons why right after the holidays might be the perfect time to get your interior repainted

Blue Door Painters, as all painting and refinishing contractors in the Washington, DC area, typically sees a slow season in the winter.  The weather prohibits exterior projects, as paints and stains require warm, dry conditions in order to effectively dry and cure, and most people are focusing on shopping and coping with the elements, rather than undertaking any major interior projects.  And indeed, any interior projects that require high levels of ventilation or a lot of traffic into and out of the house can be extremely disruptive to a household’s indoor routine.  However, the beginning of winter might be the perfect time to tackle a simple touching-up or interior beautification project.  Here are four reasons why:

1. Ceilings and walls accrue damage from holiday decorations.  You know that grayish brown streak on the ceiling from where the Christmas tree was just a little too tall, and scraped around while you were setting it up?  What about the new nail dents and horizontal streaks in the walls left over from hanging lights, wreaths, streamers, and mistletoe?  Look closely enough at the new dents and nicks that your interior has taken on from the holidays, and you will be bound to notice all the other reasons why your living or family room could use repainting.  If you let it slide until later in the season, you will most likely forget about it, but if you take the opportunity and get it done now, you will go into the New Year with all that holiday residue thoroughly painted over.

2. Interiors accrue damage from holiday parties.  Decorations aside, the holidays are the time of year for big gatherings – and that means the kind of chaos that tends to add wear and tear to your interior paint job.  Your five nieces and nephews draw on the wall while you and your siblings drink wine, your guests crowd your hallways and spill drinks in your hallways, and after all the wrapping paper has been cleared away and the calories have been ruefully counted, you realize that your interior has taken a beating and could use some sprucing up.  Doing a quick touch-up would make your space feel clean and new for the rest of the winter.

3. Having a new look helps you get a new start for the new year.  Feng Sui practitioners and interior designers have established that your physical surroundings strongly influence your emotions and behavior.  It can be difficult to get a good start on a New Years resolution when you are stuck in the same surroundings.  Even a subtle change – improving an area that has been damaged for a while, or changing the main or trim color in a room that you just haven’t liked for a while – can make a huge difference in boosting your inertia for the other changes you want to make in your life.

4. Get ready for the cold weather.  The end of the holidays means the beginning of the cold season in earnest in the Washington, DC area.  While the end of December is too late for exterior projects, you could still squeeze in the last interior project that will improve your preparedness for the winter.  Fixing any areas that have been water damaged will help your house hold up against the elements, and dealing with mold issues will make your indoor air healthier for all the time that you have to spend cooped up.  Finally, since everyone will spend more time indoors during the winter, you have to expect that the interior will see more wear and tear, and take the opportunity to put down a new layer of protective semi-gloss paint in your high-traffic areas.

Where Can I Buy Paint?

Get to know paint quality. Then decide what suits your needs. (photo by Simon Howden)

Tips for purchasing paint and painting supplies from a Washington, DC/Northern Virginia area Contracting Company

Navigating the coatings industry (“coating” = paint, stain, sealant, wallpaper, etc) can be a little overwhelming for the beginner.  This is mostly because what seems like a simple product to the uninformed consumer (aka, paint), is actually an intricately engineered concoction, and the variety of different mixtures on the market is actually pretty wide.  What kind of store you go to determines what kinds of products you will be offered, and what kind of product you select will go a long way toward determining the quality of your final paint job.

Paint can typically be purchased either from a general home improvement store, like Home Depot, or from a specialized paint store, like Sherwin Williams or Benjamin Moore.  While they have obvious overlap, these two types of store have different primary goals, which translates to a different selection of paint products.

The purpose of a store like Home Depot is to provide a one-stop-shop for homeowners who want to do home improvement projects themselves.  Typically speaking, do-it-yourselfers have a lower budget, less expertise, and less equipment than professional contractors.  With this target audience in mind, generalized home improvement stores tend to provide cheap to medium-luxury brands of paint, a comprehensive collection of equipment, and simpler, more straightforward tools.  Most signature brands of paint that are sold in specialty paint stores are not offered in general home improvement stores, because they are proprietary.  So stores like Home Depot carry the more generic, widely distributed brands of paint.  While these brands of paint will do the job, they do not have the extra care taken into the engineering that you will find at a specialty store.  They will also likely not cost as much.

The purpose of a specialty paint store is to sell paint, period.  Paint stores sell specific brands, which have been engineered to excel in various arenas.  High durability or opacity, waterproofing or flameproofing, mildew-resistance, low-VOC content, bold color retention, high clean ability, and custom finishes are all examples of the special purposes for which designer paints can be engineered.  Paint stores also sometimes sell a type of paint known as “contractor grade”.  Contractor grade paint, ironically enough, is actually extremely low – quality, intended for covering large areas in new construction.  Since specialty paint stores sell to contractors as well as homeowners (and that includes general contractors working with new construction as well as high-craftsmanship refinishing contractors like Blue Door Painters), the types of paint offered are focused on very specific goals, from the cheap new-construction paints to the extremely reliable designer paints that a refinishing contractor can stake his reputation on.

So when you are shopping for paint, you should consider the level of quality you are looking for, as well as your budget and whether you are going to have help in the execution.  Understanding what kind of paint is sold where is a solid first step toward navigating the complicated world of paint products.

Tips for Exterior Holiday Decorations

Tips on Hanging Exterior Christmas/Holiday Lights from Washington, DC Contractor

Let’s face it; December is a difficult time of year.  The days are extremely short, the weather has finally quit the glorious crisp coolness of fall and has settled into the ugly, cold, soggy slog of winter.  You have to cram yourself back into old coats, hats, slippers, and gloves, and the worst part of it is, you know you won’t get a break from all the extra gear for months.  Darkness and coldness stretches before you.

Even if you find the holidays stressful, you have to admit that driving up your street in the evening and seeing all of the beautiful creations your neighbors have made out of holiday lights sparkling on your street brings a little bit of cheer into the bleakness.  Especially when it starts to get dark around 4:30 in the afternoon, as it does in December in the Washington, DC/Northern Virginia area, the extra light and beauty makes a big difference.

If you want to add to the holiday cheer with your own seasonal decorations, but don’t know where to start, take heart.  We have provided a few tips from our reservoir of expertise.  Blue Door Painters offers a full service holiday decoration procedure, so we can take the more complicated aspects of your projects off your hands for an affordable price – but in the mean time, consider these five tips and you are sure to have a front yard that will wow and warm the hearts of your neighbors.

One: Review your home and landscaping for its decorative potential.  Every style of architecture and landscape lends itself to a unique form of decoration, and you should bring out the strengths in your exterior with your holiday decorating in the same way that you would bring out the strengths with a new paint job.  That means that you should check all the surfaces of the face of your home, and determine what would look beautiful when covered with lights.  Any structural lines are natural candidates for adornment: eaves, windows, porches, handrails, and gables all provide interesting planes for the eye to follow when decorated with twinkling lights.  Height is an important consideration, as any holiday decorating will look more sophisticated if reaches high. Consider height both in your architecture and in your landscaping; are there any high trees that can be decorated?  Are there any interesting lines in the landscaping that can be emphasized, like walkways, repeating shrubbery, small conifers, or exterior lights?  If there are large expanses of lawn, you might want to consider creating a winter or nativity scene.

Two: Pick a color palette. Holiday lights look beautiful in all colors, but if you want to have the most sophisticated composition, you should pick a color combination and keep it constant.  You could use all multicolor lights, all white, or pick a few solid colors or patterns and alternate where you string them so that you highlight important aspects of your architecture and landscaping.  Remember that with light, “cool” colors like blue, green, and violet tend to come to the foreground, while “warm” colors, like red, orange, and yellow tend to fade to the background.  You want to bring out the clean lines of your architecture and landscaping the most prominently, and then create intricate detail in the spaces in between.

Three: Plan the project out and gather the necessary equipment.  Hanging holiday lights is not complicated, but it can be frustrating and tedious if you are unprepared.  Here is what you will need:

– A good ladder, that reaches to the appropriate height

– A large bucket with a handle, to carry the strings of lights up high

– A tool belt equipped with hammer, long, thin nails, a coil of florist’s wire, wire cutters, duct tape, and insulated gloves.

You will also want to make sure that you have all of the lights you need before you start the project, and that you have a clear plan for your composition.  That will eliminate the frustration of getting halfway through the project and then having to go back out to the store.

Four: Hang the lights. Figure out where you will be plugging the string of lights in, and make sure that your outlet has the capability to run power through your entire string.  Start at that side, with the lights not yet plugged in, and move methodically through your composition.  Put up nails on smooth surfaces where you can’t find anywhere to hook them, and use the florists wire to secure them.  Do not reach too far to either side of the ladder, because it isn’t safe; go down to the bottom and move the ladder over to get those hard-to-reach areas.

After you are done decorating the face of your house, move out into the lawn, keeping track of how all the lights will ultimately connect to the power source.  Once you are all finished, you get to do the fun part: pull the ladder away, clean up any debris, and plug your lights in!  Voila!  Holiday cheer for the whole neighborhood.